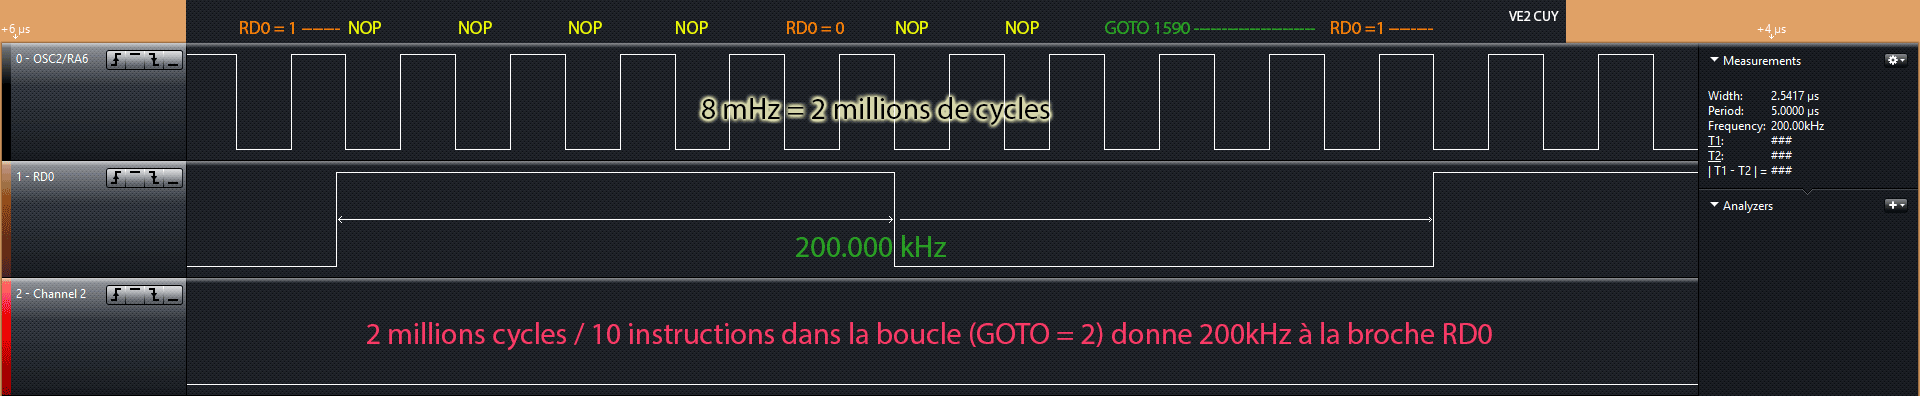
Calculer le temps d’exécution d’une instruction sous PIC 18F
Mise en situation
Étant donné la boucle suivante:
[sourcecode language= »cpp »]
Start:
PORTD = 1
PORTD = 0
AllerA Start
[/sourcecode]
Quel sera la fréquence présentée à la broche RD0?
Si nous connaissons la fréquence de Fosc et le nombre de cycles requis pour exécuter une instruction alors cela ne devrait être qu’un simple exercice de mathématique…
Comment programmer l’horloge d’un PIC 18F
Mise en situation
 Lorsque nous commençons nos premiers balbutiements avec les microcontrôleurs, un des premiers obstacles rencontrés est assurément le choix d’une source d’horloge de cadence du microcontrôleur ainsi que ses paramètres de configuration.
Pour les membres de la famille des PIC 18F, il y a quatre choix possibles pour cadencer la puce, soit à partir:
– d’un signal d’horloge externe,
– d’un circuit oscillant RC (résistance/condensateur) externe,
– d’un cristal externe,
– ou de l’horloge interne du microcontrôleur.
Dans les montages effectués par les bricoleurs maisons, le choix se situe habituellement entre l’horloge interne et le cristal externe.
L’horloge interne du PIC 18F
Le PIC 18F4553 possède une horloge interne qui peut être utilisée pour cadencer ce dernier. C’est une solution économique – pas de pièces supplémentaires à ajouter au montage – qu’on utilisera si une valeur maximale de 8 MHZ convient et qu’une imprécision d’environ +- 2% de la fréquence n’aura pas d’impact sur le système.
L’horloge interne offre les cadences suivantes :
My home data center
For those of you who like hardware, I’ve documented my home data center.
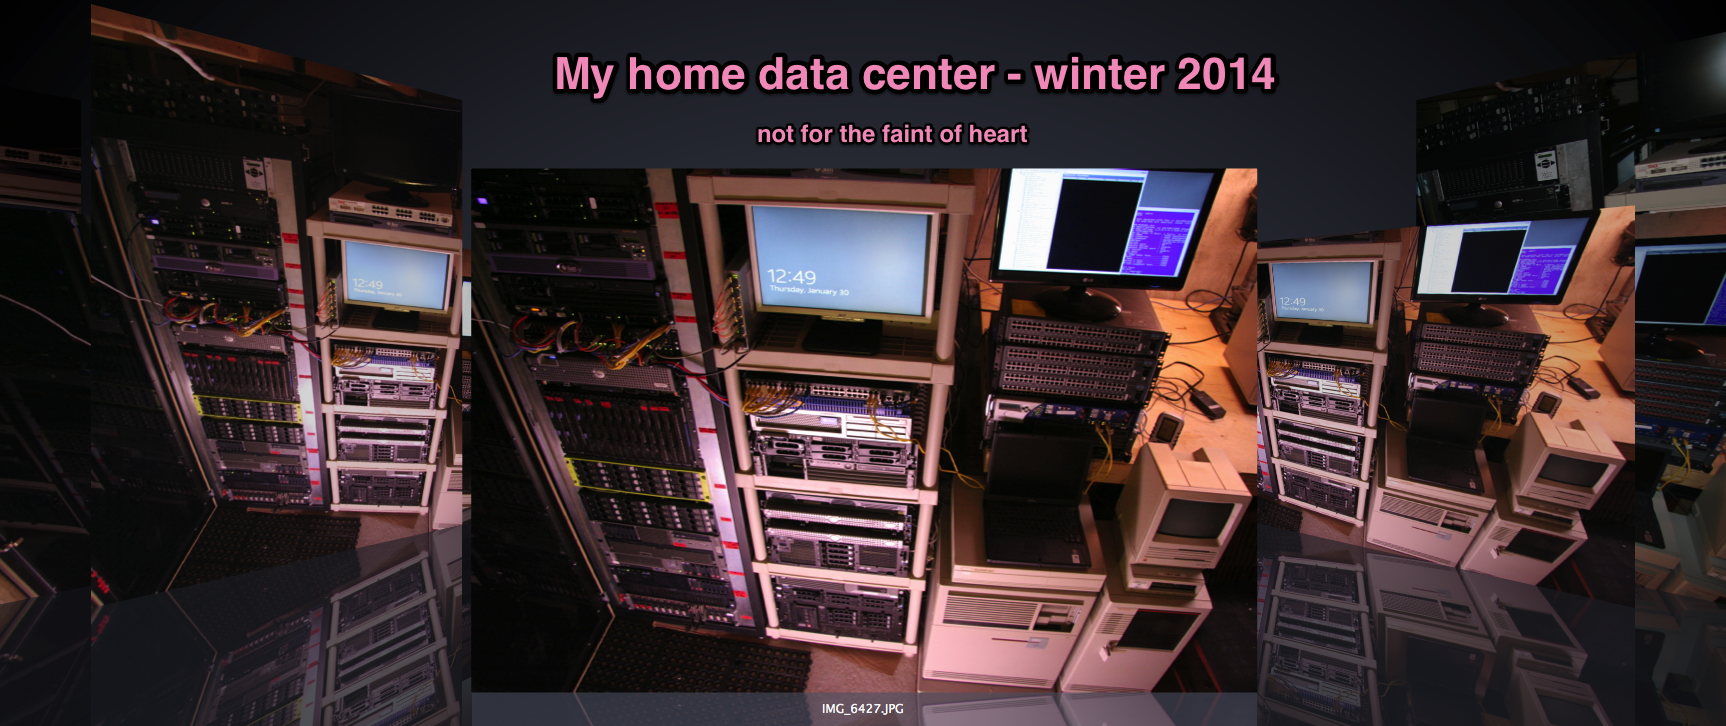
So what kind of testing goes on here?
- Hardware: enterprise class servers – Dell, HP, IBM – SAS, RAID 5, 6 + spare, RAID 50, 60, hot swap, UPS, F.C. SAN, Fibre switch, tape backup (IBM LTO3), …
- OS – Linux, Windows, OpenVMS, z/OS, HP-UX, IBM AIX, …
- Virtualization – VMware vSphere Hypervisor, vCenter server, vMotion, openStack, Xen, …
- Network – switch, CLI, LACP, MSTP, ACL, topology, fiber optic, vlan, firewall, traffic shaper, trust and untrust LAN, IPV6, …
- VOIP – Asterisk, VOIP, POE (Dell powerConnect 3448P), IP phones (Nortel 1230), SIP, …
- And much more …
Z/OS + hercules configuration file
A key element to run Z/OS on Hercules is the hercules configuration file.
This file informs, amongst other things, the location of DASD files.
To illustrate this, assume that the DASD files are in /hercules/cckd.
We will then inform the hercules.cnf file in the following way:
# DASD Devices
0A81 3390 cckd/zares1.cckd sf=shadow/zares1_*
…
0A9A 3390 cckd/sares1.cckd sf=shadow/sares1_*
A complete example of a configuation file to run Z / os in Hercules:
#
# Hercules Emulator Control file…
# Description:
# MaxShutdownSecs: 15
#
#
# System parameters
#ARCHMODE z/Arch
ALRF ENABLE
cckd RA=2,RAQ=4,RAT=2,WR=2,GCINT=5,GCPARM=0,NOSTRESS=0,TRACE=0,FREEPEND=-1
CNSLPORT 3270
CONKPALV (3,1,10)
CPUMODEL 3090
CPUSERIAL 012345
DIAG8CMD ENABLE
ECPSVM YES
LOADPARM 0A95DB..
LPARNAME HERCULES
MAINSIZE 1024
MOUNTED_TAPE_REINIT DISALLOW
NUMCPU 4
OSTAILOR Z/OS
PANRATE 80
PGMPRDOS LICENSED
SHCMDOPT NODIAG8
SYSEPOCH 1900
TIMERINT 50
TZOFFSET +1400
YROFFSET 0HERCPRIO 0
TODPRIO -20
DEVPRIO 8
CPUPRIO 0
PANTITLE z/OS 1.9 IPL A80?# Display Terminals
0700 3270
0701 3270
0702 3270
0703 3270
0704 3270# DASD Devices
0A81 3390 cckd/zares1.cckd sf=shadow/zares1_*
0A82 3390 cckd/zares2.cckd sf=shadow/zares2_*
0A83 3390 cckd/zadb81.cckd sf=shadow/zadb81_*
0A84 3390 cckd/zadb82.cckd sf=shadow/zadb82_*
0A85 3390 cckd/zadb83.cckd sf=shadow/zadb83_*
0A86 3390 cckd/zadb84.cckd sf=shadow/zadb84_*
0A87 3390 cckd/zadb91.cckd sf=shadow/zadb91_*
0A88 3390 cckd/zadb92.cckd sf=shadow/zadb92_*
0A89 3390 cckd/zacic1.cckd sf=shadow/zacic1_*
0A8A 3390 cckd/zadis1.cckd sf=shadow/zadis1_*
0A8B 3390 cckd/zadis2.cckd sf=shadow/zadis2_*
0A8C 3390 cckd/zadis3.cckd sf=shadow/zadis3_*
0A8D 3390 cckd/zadis4.cckd sf=shadow/zadis4_*
0A8E 3390 cckd/zadis5.cckd sf=shadow/zadis5_*
0A8F 3390 cckd/zadis6.cckd sf=shadow/zadis6_*
0A90 3390 cckd/zaims1.cckd sf=shadow/zaims1_*
0A91 3390 cckd/zaprd1.cckd sf=shadow/zaprd1_*
0A92 3390 cckd/zaprd2.cckd sf=shadow/zaprd2_*
0A93 3390 cckd/zaprd3.cckd sf=shadow/zaprd3_*
0A94 3390 cckd/zaprd4.cckd sf=shadow/zaprd4_*
0A95 3390 cckd/zasys1.cckd sf=shadow/zasys1_*
0A96 3390 cckd/zauss1.cckd sf=shadow/zauss1_*
0A97 3390 cckd/zawas1.cckd sf=shadow/zawas1_*
0A98 3390 cckd/zawas2.cckd sf=shadow/zawas2_*
0A99 3390 cckd/zawas3.cckd sf=shadow/zawas3_*
0A9A 3390 cckd/sares1.cckd sf=shadow/sares1_*
Here’s a video explaining the steps required to run z / OS under Hercules:
[youtube=http://www.youtube.com/watch?v=GRW4iPhCDSM]
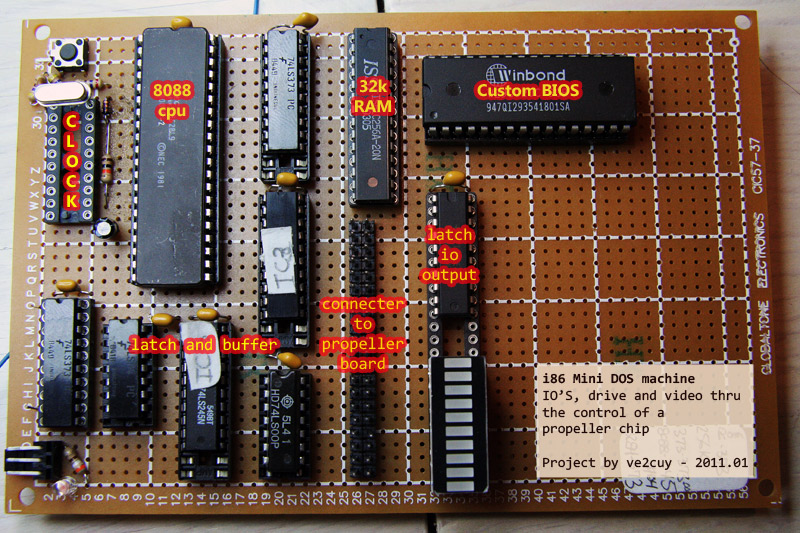
Mini i86 Dos machine
I am currently working on a mini i86 DOS machine.
An old modified PC-XT board serve as a test platform for the homemade BIOS.
All IO’s – keyboard, VGA Display, floppy disk, RS232 will be handle by a propeller chip board.
To date,
INT10 (video) and
INT 16 (keyboard) are working.
I am currently working on INT13 (disk) function.
An image disk of DOS 3.1 will be on a SD flash drive connected to the propeller chip.
To date, with INT13 AH=02 (read); sector 0, side 0, track 0, I am able to load DOS boot sector from the propeller chip.
Some pictures:


Video at:
[youtube=http://www.youtube.com/watch?v=qCj2deCFMnc]
Extract of propeller keyboard micro-code:
PRI sendKey(request) | dataToSend
dataToSend := 0 ‘ DATA to return to the 8088
if request == KEYB_AVAILABLE
if kb.gotkey
dataToSend := kb.keyNoRetrieveif request == KEYB_GET_KEY
dataToSend := kb.getkeyouta[15..8] := dataToSend
outa[DATA_AVAILABLE_FOR_8088] := 1
waitcnt(Delay_on + cnt) ‘ Wait a moment so the 8088 has time to read itouta[8..15] := 0
outa[DATA_AVAILABLE_FOR_8088] := 0
waitcnt(Delay_off + cnt)return 0
Extract of Mini DOS Machine BIOS:
; Project: MINI DOS MACHINE BIOS
; Auteur: Alain Boudreault (VE2CUY)
; Date: 2010.01.10
;——————————————————————————–.code
ORG 0hstart: jmp cold
include data.inc
COLD: MOV AX,40h
MOV DS,AX
MOV Word ptr DS:72h,0WARM:
include cpu_test.asm
JZ CPU_OK
HALT: HLTCPU_OK:
include init_8xxxChips.asm
include Get_MemSize.asm
include Install_int_vectors.asm
ifdef INST_BASIC_ROM
include Inst_Basic_Rom.asm
endifinclude Check_Devices.asm
…
Next project in the workshop
TRS-80 model 1, on a breadboard:
- Z80, 10mhz,
- 32K Flash RAM to store 12K Level II Basic
- 32K Static RAM
- ATMega32 to control I/O’s, Video, Keyboard, RS-232, …
- MicroVGA for VGA interface and ps2 keyboard input.
More to follow…
Arduino PCR1000 project available
I have decided to make the source code of my “Arduino- PRC1000” project available in its present form, as a ‘work in progress’.
It’s the same code that is use in the ‘youtube’ video so it should be working for you.
Beware that the program is available ‘As is’ with no guarantee at all. No support is available.
If you choose to use this program to send commands to your PRC1000, you do so at your own risk.
There has been some discussion on the PCR1000 mailing list that you may be able to damage the PCR1000 by sending the wrong software commands to it.
Have fun …
Project files: https://github.com/puyansude/pcr1000v6/blob/master/PCR1000Ver6.rar
Project page: http://ve2cuy.wordpress.com/arduino/
Someday …
I’ve made some progress on my 5 tubes shortwave radio.

The frequency counter prototype is working.
I’m using a MPF102 as an RF amp, then the signal is feed in a 74HC161 (16x prescaler) and finally into an atmega328p for counting.
For a video goto:
[youtube=http://www.youtube.com/watch?v=Wd0NOFe4joQ]
Optrex F-51159 glcd controlled by an Arduino
Just got some Optrex F-51159 GLCD’s from eBay.
If you ever need the datasheet or some code example to make them work with an Arduino, read further:
glcd_demo.pde
============================================================================
/*
Demo of a Optrex F-51159 controlled by an Arduino.
Note:
There is no CSEL1, CSEL2 on the F-51159. Connect CS to pin 14 (analog_0), Nothing on pin 15 (analog_1)
See: http://www.arduino.cc/playground/Code/GLCDks0108
LCD Bias voltage (-12 to -5 volts) to glcd pin 3 is mandatory.
Display is 120 x 64 dots, so make these changes to ‘ks0108_Panel.h’ :
———————————————
// for F-51159NYJ-SEW-AA
#define DISPLAY_WIDTH 120
#define DISPLAY_HEIGHT 64
// panel controller chips
#define CHIP_WIDTH 60 // pixels per chip
———————————————
*/
#include <ks0108.h>
#include « Arial14.h »
#include « clock.h » // Clock bitmap
unsigned long startMillis;
void setup(){
GLCD.Init(NON_INVERTED);
GLCD.ClearScreen();
GLCD.DrawBitmap(clock, 0,0, BLACK);
GLCD.SelectFont(Arial_14);
GLCD.GotoXY(60, 2);
GLCD.Puts(« Pixel Show »);
GLCD.GotoXY(61, 47);
GLCD.Puts(« by ve2cuy »);
countdown(9);
}
void countdown(int count){
while(count–){
GLCD.GotoXY(30, 40);
GLCD.PutChar(count + ‘0’);
delay(1000);
GLCD.GotoXY(30, 40);
GLCD.Puts( » « );
}
}
void loop(){
GLCD.ClearScreen();
startMillis = millis();
while( millis() – startMillis < 15000){
GLCD.SetDot( random(120), random(64), BLACK);
}
startMillis = millis();
while( millis() – startMillis < 15000){
GLCD.SetDot( random(120), random(64), WHITE);
}
GLCD.Init(INVERTED);
GLCD.ClearScreen();
GLCD.GotoXY(36, 24);
GLCD.Puts(« The end… »);
while (true){}
}
============================================================================
Datasheet:
[youtube=http://www.youtube.com/watch?v=yUbRnAU_2Is]